User Manual
Contents:- Installation
- Updating the firmware
- Inputs, Outputs and Controls
- Startup
- The encoder & menu system
- Selecting an algorithm
- Parameters
- Knob Recorder
- Tap Tempo
- What's saved after a power cycle
- Audio & MIDI playback from SD card
- Favourites
Installation
House the disting in a Eurorack case of your choosing. The power connector is Doepfer standard. If using the power cable supplied with the Disting, the red edge of the cable is nearest the bottom of the PCB, and carries -12V. ("-12V" is marked on the PCB itself next to this end of the connector.) Be sure to connect the other end of the power cable correctly, again so -12V corresponds to the red stripe on the cable.Updating the firmware
See this page for details on how to update the firmware on a disting, and to check you have the most recent firmware version.Inputs, Outputs and Controls
|
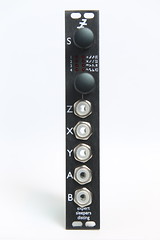
From top to bottom, the disting has
|
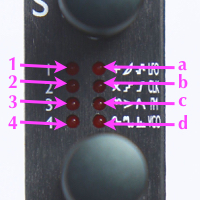
| Below we will refer to the LEDs by name as follows: the left column, from top to bottom, are LEDs 1, 2, 3 & 4; the right column are LEDs a, b, c & d. |
Startup
The sequence is as follows:
- a, 1, b, 2, c, 3, d, 4
- 1 + major bootloader version number as binary on a/b/c/d (a is LSB)
- all off
- 1 + minor bootloader version number as binary on a/b/c/d (a is LSB)
- a, b, c, d, 1, 2, 3, 4
- all 8 at once
- 1 + major firmware version number as binary on a/b/c/d (a is LSB)
- all off
- 1 + minor firmware version number as binary on a/b/c/d (a is LSB)
- 1 + flash a twice
The encoder & menu system
At this time the menus are particularly simple, there being only 4 menu items to choose from, only 2 of which you will normally need. In general, the menu system works like this:
- Press the encoder to enter menu mode.
- Turn the encoder to select the menu item (indicated on LEDs 1-4), and press to select.
- At this point the behaviour depends on the chosen menu item.
The menu items are:
- 1 - select algorithm
- 2 - select algorithm bank
- 3 - currently unused
- 4 - begin calibration
- If you accidentally enter this mode, press the Z knob to cancel
Selecting an algorithm
To quickly switch between algorithms in a bank, push and hold the S knob while turning it.
Alternatively, the algorithm can be set via menu 1. Press the encoder twice (to enter the menu, and to select menu 1). Then turn the encoder to select the algorithm. Finally, press the encoder again to switch to the chosen algorithm.
LEDs 1-4 indicate the group number; LEDs a-d indicate the selected algorithm within the group. Note that, when displaying the current algorithm, exactly one of LEDs 1-4 and one of LEDs a-d will be lit. If zero, 2, 3 or 4 LEDs are lit in a column, then the LEDs are displaying different information.
Switching algorithm banks is done via menu 2. Press the encoder (to enter the menu), turn it to select menu item 2, then press it again. Now turn the encoder to select the bank. Finally, press the encoder again to switch to the chosen bank.
See the algorithm descriptions page for detail on the available algorithms.
Parameters
Unlike the Z control, which is sampled at the same high rate as the X & Y inputs, parameters should be considered coarse, non-real-time adjustments to the algorithm. They may cause glitching in the outputs when changed.
Parameters are adjusted via the S knob. When changed, the parameter value is displayed in binary on LEDs 3, 4, and a-d. LED 3, if lit, indicates a negative number. LED a is the least significant bit; LED 4 is the most significant bit. Since 5 bits are available to display the value, all parameters are limited to the range ±31 (though some have a smaller range).
If an algorithm has more than one parameter, pressing the Z knob cycles through them. The current parameter number is displayed briefly as binary on LEDs a/b.
Knob Recorder
When this is available, holding Z down while turning it causes the Z value changes to be recorded. As soon as the knob is released, the recording is played back in a loop. To end playback, turn the Z knob slightly to regain manual control.
The maximum duration of knob recording is a little under 14 seconds.
Tap Tempo
Note that if the algorithm is dividing down the clocked frequency, pressing Z twice will not set the output to the division of the time between the two presses; rather, it will be the time between a corresponding number of button presses. E.g. if the Clockable LFO is set to 1/4 (divide by 4), the LFO time will be set by pressing the Z button 5 times, and it will only change on the 5th press.
What's saved after a power cycle
When a disting is turned off and on again, the following information is preserved:
- The current algorithm
- The current algorithm's parameters
- The Z control (implicitly, because it's completely defined by the physical position of the Z knob)
When switching between algorithms, their parameters are preserved. However, only the current algorithm's parameters survive a power cycle.
Audio & MIDI playback from SD card
From firmware v3.3 onwards, the disting includes algorithms based on sample playback from an installed MicroSD card. See this page for details.
Favourites
From firmware v3.7 onwards, you can define your own bank of 16 'favourite' algorithms, via a text file on the MicroSD card.
The favourites bank is accessed as bank 4/d. If no favourites are defined, or if there are empty slots, the disting runs algorihm 1/a 1-a, the Precision Adder.
The favourites are read from the SD card, if present, at power on. They are then stored in the disting's flash memory, and so persist even after the card is removed.
The favourites file is a simple text file which must be named 'favourites.txt' and placed in the root of the SD card (not inside any folder). The contents look something like this:
disting favourites v1
1/a 1-a
1/a 4-d VCO
1/c 2-b dual AR w/ push
2/a 1-d SD z speed
1/a 4-a LFO
1/b 2-a resonator
The first line must be "disting favourites v1". Subsequent lines specify an algorithm to add to the list of favourites. After 16 algorithms, any further lines are ignored.
Each algorithm is specified as a bank number followed by an algorithm number. Any further text after the algorithm number is ignored, so you can add a descriptive string (as in the example above) to help you remember what's what.